Creating new rows
This information is only designed for people with a detailed knowledge of PHP, the WordPress framework, HTML, CSS and Javascript/jQuery. The following instructions can easily break a website if done incorrectly.
Extending Fluidal to add new rows and functionality is a relatively logical process, due to it’s modular approach. The basic principles are as follows:
- Always make changes to the child theme, not the underlying parent Fluidal theme. Otherwise customisations will get overwritten if the parent theme gets updated.
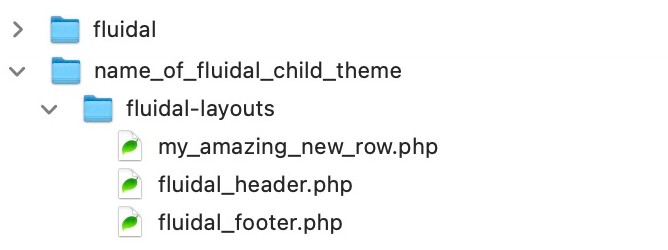
- Each row is a separate php file which must reside within a directory called fluidal-layouts at the root level of the child theme. Check to see if this directory already exists in the child theme. If not, then create one and copy over fluidal-header.php and fluidal-footer.php from the parent theme. Depending on the new row which you wish to create, you might find it useful to copy over an existing template row from the parent fluidal-layouts directory as a starting point to edit. Note: you do not need to copy over all of the existing rows from the parent directory into the child directory – just the new new ones which you create.
- Make sure this new file has a unique name (in the example below, the new template is called my_amazing_new_row.php). Make a note of the name of this new template as this exact name will be needed in step 5.

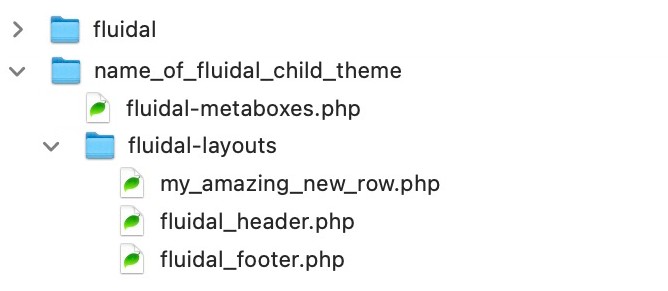
- You will then need to create the backend fields for your new row and add them to a file called fluidal-metaboxes.php. Once again check to see if fluidal-metaboxes.php exists at the root level of the child theme. If not, then copy over this file from the root level of the parent Fluidal theme into the root level of the child theme.

- The new fields need to be added to the function called fluidal_page_builder() in fluidal-metaboxes.php (starting from around line 81) – keep all the existing code in place in this file and simply add your new fields to the array within the fluidal_page_builder() function. It may help to copy an existing set of fields within fluidal_page_builder() as a starting point. Once you’ve copied a set of fields, change the –>add_fields() value to the name of the new template you’ve created in step 3. Make sure it’s a unique name otherwise you’ll break the website e.g in this example, the new set of fields in fluidal-metaboxes.php would be called my_amazing_new_row which matches the name of the new template created in step 3.
->add_fields( 'my_amazing_new_row', 'Friendly name of row here', array_merge( ...... )
- Then create any custom CSS and either add that into style.css within the child theme or directly into the new template created in step 2, wrapped within <style></style> tags.
- Then finally create any custom Javascript/jQuery as required and add that to functions.js within the child theme or directly into the new template created in step 2 wrapped within <script></script> tags.
- You should then find that your new row is now selectable within the page builder interface in the backend of WordPress.
If you have any queries or issues, then contact us for further assistance.


